Oracle 11g ASM Diskgroup Compatibility – Airy’s Notes

Oracle 11g ASM Diskgroup Compatibility:

In Oracle 10.2, the are two new column COMPATIBILITY and DATABASE_COMPATIBILITY added to the V$ASM_DISKGROUP view, but only in Oracle 11g introduce the concept of diskgroup attributes and the V$ASM_ATTRIBUTE view.

New Disk Group Compatibility Attributes

Oracle 11g ASM includes two new compatibility attributes (compatible.asm and compatible.rdbms ) that determine the version of the ASM and database software that can use specific disk groups :

  • COMPATIBLE.ASM – The minimum version of the ASM software that can access the disk group. In 11g, the default setting is 10.1.
  • COMPATIBLE.RDBMS – The minimum COMPATIBLE database initialization parameter setting for any database instance that uses the disk group. In 11g, the default setting is 10.1.

The compatibility versions of a disk group can only be increased, not decreased. If you have increased the version by mistake, you will need to create a new disk group.

The disk group compatibility attributes can be set during disk group creation by adding the ATTRIBUTE clause to the CREATE DISKGROUP command.

compatible.asm is the Oracle disk group compatibility attribute. The Oracle disk group compatible.asm attribute setting defines the format of the data on the ASM disks, and should always be equal to or greater than the Oracle database compatibility parameter.

The compatible.rdbms attribute is the second attribute known as the Oracle database compatibility attribute. The compatible.rdbms attribute defines the minimum version of an Oracle database that can mount a specific disk group. The compatible.rdbms attribute should be set to a value that is equivalent to the lowest compatibility setting of any Oracle database that will be mounting that disk group.

The compatible.asm attribute must always be set to a value that is equal to or greater than the compatible.rdbms attribute. Once the compatible.asm attribute is set, it cannot be rolled back.

Once the compatible.rdbms attribute is set, it cannot be rolled back. This is because ASM will be writing to the disk and communicating with the database in a version specific format. Oracle does allow you to roll the setting forward.

Thus, there are two ways to check the diskgroup attributes in Oracle 11g:

SQL> col COMPATIBILITY for a10               

SQL> col DATABASE_COMPATIBILITY for a10

SQL> col NAME form a20

SQL> select group_number, name, compatibility, database_compatibility from v$asm_diskgroup;

GROUP_NUMBER NAME                 COMPATIBIL DATABASE_C

------------ -------------------- ---------- ----------

           1 PAWFG                 11.2.0.0.0 11.2.0.0.0

           2 DATA                 11.2.0.0.0 10.1.0.0.0

SQL> col value for a10

SQL> @dg_attribs1.sql;

dg name              attrib name                    VALUE                READ_ON

-------------------- ------------------------------ -------------------- -------

PAWFG                 disk_repair_time               5h                   N

PAWFG               au_size                        1048576              Y

PAWFG                access_control.umask           066                  N

PAWFG                access_control.enabled         FALSE                N

PAWFG               cell.smart_scan_capable        FALSE                N

PAWFG              compatible.rdbms               11.2.0.0.0           N

PAWFG                 compatible.asm                 11.2.0.0.0           N

PAWFG                 sector_size                    512                  Y

DATA                 disk_repair_time               3.6h                 N

DATA                 access_control.enabled         FALSE                N

DATA                 cell.smart_scan_capable        FALSE                N

DATA                 compatible.rdbms               10.1.0.0.0           N

DATA                 compatible.asm                 11.2.0.0.0           N

DATA                 sector_size                    512                  Y

DATA                 au_size                        1048576              Y

DATA                 access_control.umask           066                  N

16 rows selected.

Note that V$ASM_ATTRIBUTES is filled only when compatible.asm is set to 11.1. What’s important is that you can only change compatibility level upwards; there is no way to reset it back to the lower value.

Compatibility attributes can be changed online one at a time:

SQL> alter diskgroup DATA set attribute 'compatible.asm'='11.2.0.0.0';

Diskgroup altered.

SQL> SQL> alter diskgroup DATA set attribute 'compatible.rdbms'='11.2.0.0.0';

Diskgroup altered.

 SQL> select group_number, name, compatibility, database_compatibility from v$asm_diskgroup;

GROUP_NUMBER NAME                 COMPATIBIL DATABASE_C

------------ -------------------- ---------- ----------

           1 PAWFG                11.2.0.0.0 11.2.0.0.0

           2 DATA                 11.2.0.0.0 11.2.0.0.0

What are compatibility attributes are useful for? They are very handy for upgrades and migrations when ASM diskgroups need to be available for ASM instances and database instances of different versions. Depending on the migration path, you might need to be able to access some diskgroups from different versions of ASM and different database instances.

It might also be useful for transportable tablespaces between 10g and 11g databases.

The compatible.asm diskgroup attribute controls the format of the ASM diskgroup metadata. Only ASM instances with a software version equal to or greater than compatible.asm can mount the diskgroup.

As we know The compatible.rdbms diskgroup attribute determines the format of ASM files themselves. The diskgroup can be accessed by any database instance with a compatible init.ora parameter set equal to or higher than the compatible.rdbms attribute.

Note that the compatible.rdbms attribute can be set to 10.2 as well, but we couldn’t see if there were any differences in the feature set except that the compatible.rdbms=10.2, setting requires a database instance with the compatible parameter set to 10.2 or higher. compatible.asm cannot be set below 11.1 except when it’s already 10.1 by default.

The compatible.rdbms attribute can be changed only if compatible.asm is advanced to 11.1. Otherwise, you get the following error message:

SQL> alter diskgroup DATA set attribute 'compatible.rdbms'='11.1';

alter diskgroup DATA set attribute 'compatible.rdbms'='11.1'

*

ERROR at line 1:

ORA-15032: not all alterations performed

ORA-15242: could not set attribute compatible.rdbms

ORA-15221: ASM operation requires compatible.asm of 11.1.0.0.0 or higher

When creating a new diskgroup, compatibility attributes can be explicitly specified. It is interesting that the default is still 10.1 for both attributes even when the diskgroup is created from an ASM 10g instance and all connected databases are of 11g version. Oracle is conservative here.

IF we want to set default compatibility , there are two underscore hidden parameter exits which shows, what exactly the default compatibilty: _asm_compatibility and _rdbms_compatibility:

SQL> select i.ksppinm, v.ksppstvl from x$ksppi i, x$ksppcv v where i.ksppinm in ('_rdbms_compatibility','_asm_compatibility') and i.indx=v.indx;

KSPPINM                        KSPPSTVL

------------------------------ ----------

_asm_compatibility             10.1

_rdbms_compatibility           10.1

Let’s test.

SQL> alter system set "_asm_compatibility"='11.1' scope=spfile;

System altered.

SQL> alter system set "_rdbms_compatibility"='11.1' scope=spfile;

System altered.

SQL> shutdown immediate

ASM diskgroups dismounted

ASM instance shutdown

SQL> startup

ASM instance started

Total System Global Area  284565504 bytes

Fixed Size                  1299428 bytes

Variable Size             258100252 bytes

ASM Cache                  25165824 bytes

ASM diskgroups mounted

SQL> select i.ksppinm, v.ksppstvl from x$ksppi i, x$ksppcv v where i.ksppinm in ('_rdbms_compatibility','_asm_compatibility') and i.indx=v.indx;

KSPPINM                        KSPPSTVL

------------------------------ ----------

_asm_compatibility             11.1

_rdbms_compatibility           11.1

SQL> create diskgroup DATA1 external redundancy disk ' /dev/oracleasm/disks/DISK10' ATTRIBUTE 'compatible.asm' = '11.1';

Diskgroup created.

SQL> select name, compatibility, database_compatibility from v$asm_diskgroup where name='DATA1';

NAME                 COMPATIBIL DATABASE_C

-------------------- ---------- ----------

DATA1                  11.1.0.0.0 11.1.0.0.0
SQL> CREATE DISKGROUP DATA2 DISK '/dev/oracleasm/disks/DISK11' ATTRIBUTE 'compatible.rdbms' = '11.2', 'compatible.asm' = '11.1';

Diskgroup created.

SQL> select group_number, allocation_unit_size, compatibility, database_compatibility from v$asm_diskgroup where name='DATA2';

GROUP_NUMBER ALLOCATION_UNIT_SIZE COMPATIBIL DATABASE_C

------------ -------------------- ---------- ----------

           4              2097152 11.2.0.0.0 11.1.0.0.0

Now what features are available with different compatibility settings?

 Diskgroup attributes:

compatible.asm — 11.1
compatible.rdbms — any

 Non-default allocation unit size :

For AU sizes 1-8 MB, both compatibility attributes can be 10.1.

SQL> select group_number, allocation_unit_size, compatibility, database_compatibility from v$asm_diskgroup where name='DATA3';

GROUP_NUMBER ALLOCATION_UNIT_SIZE COMPATIBIL DATABASE_C

------------ -------------------- ---------- ----------

           5             2097152 10.0.0.0.0 10.1.0.0.0

SQL> select group_number, name, value from v$asm_attribute where group_number=4;

no rows selected

The absence of the attribute au_size in V$ASM_ATTRIBUTE is confusing, but recall that attributes are displayed only when compatible.asm is set to 11.1.

SQL> select group_number, name, value from v$asm_attribute where group_number=4;

GROUP_NUMBER NAME                 VALUE

------------ -------------------- --------------------

           3 disk_repair_time     3.6h

           3 au_size              2097152

           3 compatible.asm       11.1.0.0.0

           3 compatible.rdbms     10.1.0.0.0

For AU sizes 16-64 MB both compatibility attributes must be 11.1.

@dg_attribs1.sql

--Show disk group attributes

col "dg name" for a20

col "attrib name" for a30

col value for a20

set pagesize 20

select dg.name  "dg name"

      ,a.name   "attrib name"

      ,a.value

      ,read_only

from v$asm_diskgroup dg,

     v$asm_attribute a

where

dg.group_number = a.group_number

and a.name not like 'template%';

Thank you for reading… This is Airy…Enjoy Learning:)

#asm

ASM Preferred Mirror Read in Oracle 11g R2 – Airy’s Notes

ASM Preferred Mirror Read in Oracle 11g R2:

Until Oracle 10g, Automatic Storage Management used to read only Primary copy of extents. This isn’t a problem when both nodes and both failure groups are all located in the same site (i.e. This works fine if Real Application Cluster environment is not extended), but it can be inefficient for extended clusters, causing needless network traffic. In case of extended RAC (when RAC nodes and Storage are placed at different locations) suppose there are two sites A (with RAC node and storage) and B (with RAC node and storage) located at two different locations.

If node B needs and extent which has primary copy at Storage A and mirror copy at Storage B, So, B has to go to Storage A for primary copy which cause a high traffic on network.

To overcome this, Oracle 11g introduce ASM preferred Mirror Read. Reference from above example, Now, if B has mirror copy of extent at storage B, it will read mirror copy only rather than going to primary extent at site A and will increase the performance. Oracle 11g allows each node to define a preferred failure group, allowing nodes in extended clusters to access local failure groups in preference to remote ones.

How to Setup ASM Preferred Mirror Read:

A new parameter ASM_PREFERRED_READ_FAILURE_GROUP is introduced at ASM instance level. Each Automatic Storage Instance has this parameter value which should points to its local disk groups.

To configure preferred read failure groups the disk group compatibility attributes must be set to 11.1 or higher. Once the compatibility options are correct, the ASM_PREFERRED_READ_FAILURE_GROUPS parameter is set to the preferred failure groups for each node.
Each time when there is a read request and extent exists at local disks either primary or mirror copy it will read from local disk and gives a improved performance.

Command to change parameter:

 SQL> alter system set asm_preferred_read_failure_groups='ams_diskgroup_name.asm_failure_group_name';

Steps to follow :

SQL> select name from v$asm_diskgroup;

NAME

----------

PAWFG

DATA
SQL> select name,failgroup from v$asm_disk;

NAME                      FAILGROUP

---------- ---------------------------

DATA_0000              DATA_0000

DATA_0001              DATA_0001

DATA_0002              DATA_0002

PAWFG_0000           PAW_FG1

PAWFG_0001           PAW_FG1

PAWFG_0002           PAW_FG1

PAWFG_0003           PAW_FG2

PAWFG_0004           PAW_FG2

PAWFG_0005           PAW_FG2

10 rows selected.
SQL> alter system set asm_preferred_read_failure_groups='PAWFG.PAW_FG2';
 
 System altered.

SQL> ALTER SYSTEM SET ASM_PREFERRED_READ_FAILURE_GROUPS = 'DATA.DATA_0000', 'DATA.DATA_0001', 'DATA.DATA_0002';

Crosscheck for implementation:

SQL> SHOW PARAMETER asm_preferred_read_failure_groups;
 
 NAME                                 TYPE        VALUE
 ------------------------------------ ----------- --------------------------
 asm_preferred_read_failure_groups    string      PAWFG.PAW_FG2

Thank you for reading… This is Airy…Enjoy Learning:)

#asm

ASM Enhancements-Airy’s Notes

1: ASM Optimal Disk Placement (ODP) in Oracle 11g R2-Airy’s Notes

2: ASM Preferred Mirror Read in Oracle 11g R2 – Airy’s Notes

3: ASM Restart Feature in Oracle 11g R2 – Airy’s Notes

4: Oracle 11g ASM Diskgroup Compatibility – Airy’s Notes

5: Using ASM Scalability and Performance Enhancements in Oracle 11g – Airy’s Notes

6: Oracle ASM File Access Control for Disk Groups in Oracle 11g –  Airy’s Notes

7: Automatic Storage Management Fast Mirror Resync in Oracle 11g – Airy’s Notes


Thank you for reading… This is Airy…Enjoy Learning:)

#asm

ASM Optimal Disk Placement (ODP) in Oracle 11g R2-Airy’s Notes

ASM Optimal Disk Placement (ODP) in Oracle 11gR2:

 As of Oracle 11gR2 it is possible to specify on which disk regions the ASM Disks will be placed. This enables us to make use of faster disk zones on the outer regions of disks for better I/O performance.

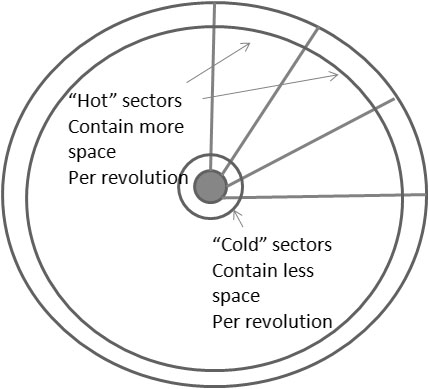
In spinning disk more data passes below the read/write on the outer portion of the disk because the greater circumference, hence overall throughput is improved, if all the data is in outer most segment then seek latency may reduce as well since the read/write head moves the shorter arc.

Optimal Disk Placement can be specified by associating an ASM Template in which primary extent zone is set to HOT or COLD. If set HOT then these file are stored in faster outer most track of the disk and experience greater throughput and reduce latency. If set COLD then these file are stored in middle track of the disk and experience low throughput and high latency.

ASM Optimal Disk Placement (ODP) in Oracle 11gR2-Pic1

Oracle has been sitting together with storage vendors and found ways to enable ASM to make use of storage intelligence features. These settings can be made on DiskGroup Templates and are changeable afterwards with an ALTER DISKGROUP statement.

Possible options are hot/mirrorhot and cold/mirrorcold.

ALTER DISKGROUP disk_group ADD TEMPLATE template

ATTRIBUTES (

MIRROR|UNPROTECTED

FINE|COARSE

HOT|COLD

MIRRORHOT|MIRRORCOLD )


ALTER DISKGROUP diskgroup ALTER FILE ‘filename’

ATTRIBUTES (

HOT|COLD

MIRRORHOT|MIRRORCOLD )

Intelligent Data Placement enables you to specify disk regions on Oracle ASM disks for best performance. Using the disk region settings you can ensure that frequently accessed data is placed on the outermost (hot) tracks which have greater speed and higher bandwidth. In addition, files with similar access patterns are located physically close, reducing latency. Intelligent Data Placement also enables the placement of primary and mirror extents into different hot or cold regions.ASM intelligent file placement : 

Intelligent file placement has been done in non-relational databases since the 1980’s but it is new to Oracle in Oracle 11g release 2.  Thecompatible.asm and compatible.rdbms disk group attributes must be set to 11.2 or higher to use intelligent data placement. Also see the v$asm_disk_iostat view to access this ASM information.

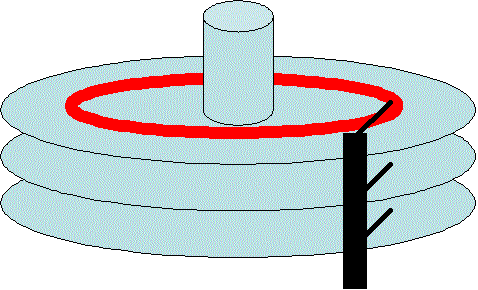
Manual file placement:  Middle tracks

Here is a randomized disk file where read-write head movement cripples response time:

As I note in the plague of super-large Oracle disks, intelligent file placement can dramatically improve throughout by minimizing the movement of the read-write head by intelligently placing popular data files near the middle absolute track and unpopular files on the outer tracks.

Per the “zoned bit recording” architecture, the outer cylinders contain more sectors than the inner platters.

As shown next, high impact data files should be placed to minimize read-write head movement. In this manual method, it is intended to minimize the travel of the read-write head, whose movement comprises over 90% of the cost of a disk I/O.  However, this approach does not hold true when you have disks with fixed read-write heads (a read/write head for every disk cylinder).

ASM Optimal Disk Placement (ODP) in Oracle 11gR2-Pic2

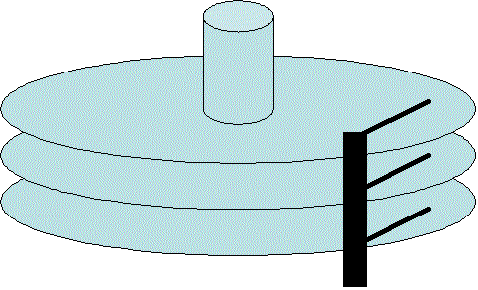
Oracle 11g R2 Intelligent file placement:  Outer tracks :

ASM Optimal Disk Placement (ODP) in Oracle 11gR2-Pic3

Intelligent file placement has been done in non-relational databases since the 1980’s but it is new to Oracle in Oracle 11g release 2 and it uses a different approach than the above manual intelligent file placement.

Oracle 11g release 2 introduced “intelligent data placement” (IDP) within ASM whereby a file or in disk group template can map to these hot and cold area of the Oracle platter.

It is the “Zoned Bit Recording” method (whereby the outer cylinders hold more sectors) that drives intelligent data placement, leveraging on the hardware geometry to optimize I/O into “hot” and “cold” areas.  Remember, it is the DBA who marks the files as hot and cold, Oracle does not do this for you.

ASM Optimal Disk Placement (ODP) in Oracle 11gR2-Pic1

On large disks where the data cannot be fully cached in the data buffers, we might consider placing high I/O data files in the middle absolute track number to minimize read-write head movement.  This is a situation in which the low access data files reside on the inner and outer cylinders of the disk.

The use of intelligent disk placement can improve I/O performance by placing more frequently accessed data in regions furthest from the spindle, while reducing your cost by increasing the usable space on a disk.

Here is hot to mark an ASM datafile as “hot”.  We assume that this causes Oracle to relocate this ASM file to the outermost disk cylinders where you get more data per revolution:

SQL> alter diskgroup
mygroup
modify
file ‘+data/ora/datafile/users’
attribute ( hot  mirrorhot);

The Oracle documentation does not say of the above command immediately moves the data files on the disk, but it is safe to assume that this should be a DBA task that should not be done while the production database is open to the end-users.

The use of intelligent disk placement can improve I/O performance by placing more frequently accessed data in regions furthest from the spindle, while reducing your cost by increasing the usable space on a disk.

The compatible.asm and compatible.rdbms disk group attributes must be set to 11.2 or higher to use intelligent data placement.

Alter diskgroup DATA set attribute ‘compatible.asm’=’11.2’;

Alter diskgroup DATA set attribute‘compatible.rdbms’=’11.2’;

Here is hot to mark an ASM datafile as “hot” and note the new “mirrorhot” argument, indicating that the mirrored disk will also be handled:

SQL> alter diskgroup mygroup

modify

           file ‘+data/ora/datafile/users’

attribute ( hot  mirrorhot);

 The Oracle documentation does not say of the above command immediately moves the data files on the disk, but it is safe to assume that this should be a DBA task that should not be done while the production database is open to the end-users.

The following query can be used to inspect hot reads and how writes:

display_hot_cold_files.sql

SQL> select

dg.name

diskgroup,
t.name,
t.stripe,
t.redundancy,
t.primary_region,
t.mirror_region
from
v$asm_diskgroup dg,
v$asm_template   t
where
dg.group_number = t.group_number
and
dg.name = ‘DATA’ ORDER BY t.name;

SQL> select
dg.name diskgroup,
f.file_number,
f.primary_region,
f.mirror_region,
f.hot_reads,
f.hot_writes,
f.cold_reads,
f.cold_writes
from
v$asm_diskgroup dg,
v$asm_file f
where
dg.group_number = f.group_number and dg.name = ‘DATA’;

Also note that the view v$asm_disk_iostat has new columns for hot_reads and hot_writes and cold_reads and  cold_writes to correspond with this disk segregation techniques that leverages on the geometry of the disk platter to improve overall throughput.  See later in this chapter for a script to measure these access speeds on an ASM disk.

Thank you for reading… This is Airy…Enjoy Learning:)


#asm, #odp

Oracle Restart Feature in Oracle 11g

What is Oracle Restart feature in Oracle 11g:

With Oracle Real Application Clusters the Oracle database can be configured to restart as each node in the cluster is restarted.  For single instance databases that are on a standalone server, often times the database is not configured to restart on a server bounce.

If you install Oracle Restart by installing the Oracle Grid Infrastructure for a standalone server and then create your database, the database is automatically added to the Oracle Restart configuration, and is then automatically restarted when required. However, if you install Oracle Restart on a host computer on which a database already exists, you must manually add the database, the listener, the Oracle Automatic Storage Management (Oracle ASM) instance, and possibly other components to the Oracle Restart configuration.

In the past, Oracle recommended to set the database for restart in the /etc/oratab file and create as script in the /etc/init.d directory to force the restart. Some times this approach often times did not work. How do we enable a restart of a single instance database successfully?

That means Oracle Restart is a component of the Oracle Grid Infrastructure (GI) package which is used to configure a restart of items on the server, ie Oracle Database (single instance).  The added benefit of using Oracle Restart (Grid Infrastructure) is the usage of Automatic Storage Management (ASM) is included. As we already know Databases that are created after Oracle Restart is installed will use ASM and all previous databases (file system based) will not be configured in the Cluster Ready Service (CRS) stack.  How do we add a database to the CRS stack after Oracle Restart is installed?

To add a database to the CRS stack, we need to use the Server Control (SRVCTL) command. The below command will add a database named “PAWASM” to the stack and enable it to be restarted when the server is restarted.  Each of the options used can be looked up with the help option ($GRID_HOME/bin/srvctl –h).

Using Oracle Restart is a great approach to enabling single instance databases for successful restarts.  Also, the ability to use Automatic Storage Management (ASM) and Cluster Ready Services (CRS) enables a DBA to learn more about these options before moving to a full Real Application Cluster (RAC).

Configuring Oracle Restart in Oracle 11g :

1: Adding Components to the Oracle Restart Configuration:

In most cases, creating an Oracle component on a host that is running Oracle Restart automatically adds the component to the Oracle Restart configuration. The component is then automatically restarted when required.

Adding a component to the Oracle Restart configuration is also referred to as “registering a component with Oracle Restart.”

 The following are occasions when you must manually add components to the Oracle Restart configuration with SRVCTL:

You create an additional Oracle database on the same host computer using the CREATE DATABASE SQL statement.

You create a database service with DBMS_SERVICE.CREATE_SERVICE package procedure. (The recommended way is to use SRVCTL.)

Adding a component to the Oracle Restart configuration does not start that component. You must use a srvctl start command to start it.

When you manually add a database to the Oracle Restart configuration, you must also add the Oracle grid infrastructure software owner as a member of the OSDBA group of that database. This is because the grid infrastructure components must be able to connect to the database as SYSDBA to start and stop the database.

For example, if the host user who installed the grid infrastructure home is named grid and the OSDBA group of the new database is named dba, then user grid must be a member of the dba group.

Manually Adding components to the Oracle Restart configuration with SRVCTL:

$srvctl add object options

Where object can be datatabase,service,listener.

1: Adding a Database :

This example adds a database with a DB_UNIQUE_NAME of ORCL. The mandatory -o option specifies the Oracle home location. The -c option specifies a single-instance database.

[oracle@PAWASM Desktop]$ srvctl add database -d ORCL -o /u01/app/oracle/product/11.2.0/db_1 -c SINGLE

2: Adding a Database Service :

For the database with the DB_UNIQUE_NAME of ORCL, this example both creates a new database service named SERVPAW and adds it to the Oracle Restart configuration.

[oracle@PAWASM Desktop]$ srvctl add service -d ORCL -s SERVPAW

3: Adding the Default Listener :

This example adds the default listener to the Oracle Restart configuration.

[oracle@PAWASM Desktop]$ srvctl add listener <Listener Name>

Adding Components with Oracle Enterprise Manager Database Control

With Oracle Enterprise Manager Database Control (Database Control), you can add only database instances and listeners to the Oracle Restart configuration.

To add a database instance with Database Control:

Access the Database Home page for the desired database instance.

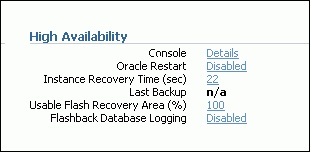
In the High Availability section, next to the Oracle Restart label, click the Disabled link.

Oracle_Restart

If the Oracle Restart label shows “Enabled,” then the database is already being managed by Oracle Restart, and there is no need to continue.

  1. If prompted for host credentials, enter credentials for the user who installed the database Oracle home, and then click Login.
  2. On the confirmation page, click Continue.

To add a listener with Database Control:

  1. Access the Database Home page for the desired database instance.
  2. In the General section, click the link next to the Listener label.
  3. In the High Availability section, next to the Oracle Restart label, click the Disabled link.
  4. On the confirmation page, click Continue.

2: Removing Components from the Oracle Restart Configuration:

When you use an Oracle-recommended method to delete an Oracle component, the component is also automatically removed from the Oracle Restart configuration. For example, if you use Database Configuration Assistant (DBCA) to delete a database, DBCA removes the database from the Oracle Restart configuration. Likewise, if you use Oracle Net Configuration Assistant (NETCA) to delete a listener, NETCA removes the listener from the Oracle Restart configuration.

If you use a non-recommended or manual method to delete an Oracle component, you must first use SRVCTL to remove the component from the Oracle Restart configuration. Failing to do so could result in an error.

To remove a component from the Oracle Restart configuration:

$srvctl remove object [options]

Removing a Database

This example removes a database with a DB_UNIQUE_NAME of ORCL.

[oracle@PAWASM Desktop]$ srvctl remove database -d ORCL

3: Disabling and Enabling Oracle Restart Management for a Component:

You can temporarily disable Oracle Restart management for a component. One reason to do this is when you are performing maintenance on the component. For example, if a component must be repaired, then you might not want it to be automatically restarted if it fails or if the host computer is restarted.

When maintenance is complete, you can reenable management for the component.

When you disable a component:

  • It is no longer automatically restarted.
  • It is no longer automatically started through a dependency.
  • It cannot be started with SRVCTL.
  • Any component dependent on this resource is no longer automatically started or restarted.

To disable or enable automatic restart for a component:

To disable a component, enter the following command:

$srvctl disable object [options]

To enable a component, enter the following command:

$srvctl enable object [options]

Disabling Automatic Restart for a Database

This example disables automatic restart for a database with a DB_UNIQUE_NAME of ORCL.

[oracle@PAWASM Desktop]$ srvctl disable database -d ORCL

Disabling Automatic Restart for an Oracle ASM Disk Group

This example disables automatic restart for the Oracle ASM disk group named recovery.

[oracle@PAWASM Desktop]$ srvctl disable diskgroup -g recovery

Enabling Automatic Restart for an Oracle ASM Disk Group

This example reenables automatic restart for the disk group recovery.

[oracle@PAWASM Desktop]$ srvctl enable diskgroup -g recovery

4: Viewing Component Status

You can use SRVCTL to view the running status (running or not running) for any component managed by Oracle Restart. For some components, additional information is also displayed.

$srvctl status object [options]

Viewing Status of a Database

This example displays the status of the database with a DB_UNIQUE_NAME of ORCL.

[oracle@PAWASM Desktop]$ srvctl status database -d ORCL
Database is running.

5: Viewing the Oracle Restart Configuration for a Component

You can use SRVCTL to view the Oracle Restart configuration for any component. Oracle Restart maintains different configuration information for each component type. In one form of the SRVCTL command, you can obtain a list of components managed by Oracle Restart.

$srvctl config object options

Viewing a List of All Databases Managed by Oracle Restart

[oracle@PAWASM Desktop]$ srvctl config database
AIRYASM

ORCL

Viewing the Configuration of a Particular Database

This example displays the configuration of the database with a DB_UNIQUE_NAME of ORCL.

for a Component

[oracle@PAWASM Desktop]$ srvctl config database -d ORCL
Database unique name: ORCL

Database name: ORCL

Oracle home: /u01/app/oracle/product/11.2.0/dbhome_1

Oracle user: oracle

Spfile: +DATA/ORCL/spfileORCL.ora

Domain: pawasm.example.com

Start options: open

Stop options: immediate

Database role:

Management policy: automatic

Disk Groups: DATA

Services: mfg,sales

6: Modifying the Oracle Restart Configuration

You can use SRVCTL to modify the Oracle Restart configuration of a component. For example, you can modify the port number that a listener listens on when Oracle Restart starts it, or the server parameter file (SPFILE) that Oracle Restart points to when it starts a database.

To modify the Oracle Restart configuration for a component:

[oracle@PAWASM Desktop]$ srvctl modify object options

Modifying the Oracle Restart Configuration for a Database

For the database with a DB_UNIQUE_NAME of ORCL, the following command changes the management policy to MANUAL and the start option to NOMOUNT.

[oracle@PAWASM Desktop]$ srvctl modify database -d ORCL -y MANUAL -s NOMOUNT

With a MANUAL management policy, the database is never automatically started when the database host computer is restarted. However, Oracle Restart continues to monitor the database and restarts it if a failure occurs.

As with the CRS on a full RAC, we can get the list of targets and check on the status of them using the same command (crs_stat –t –v).

[oracle@PAWASM Desktop]$ crs_stat -t -v

 Name           Type           R/RA   F/FT   Target    State     Host        
-------------------------------------------------------------------------
 ora.DATA.dg    ora….up.type   0/5    0/     ONLINE    ONLINE    PAWASM      
 ora….ER.lsnr   ora….er.type   0/5    0/     ONLINE    ONLINE    PAWASM      
 ora.asm        ora.asm.type   0/5    0/     ONLINE    ONLINE    PAWASM      
 ora….ORCL.db   ora….se.type   0/2    0/1    ONLINE    ONLINE    PAWASM      
 ora.cssd       ora.cssd.type  0/5    0/5    ONLINE    ONLINE    PAWASM      
 ora.diskmon    ora….on.type   0/10   0/5    OFFLINE   OFFLINE               
 ora.evmd       ora.evm.type   0/10   0/5    ONLINE    ONLINE    PAWASM      
 ora.ons        ora.ons.type   0/3    0/     OFFLINE   OFFLINE

Thank you for Reading…This is Airy… Enjoy :)

Also Read Below Given Links:

1: Using Database Replay

2: Database Replay System Architecture

3: Database Replay PL/SQL Procedures -I ( Capture )

4: Database Replay PL/SQL Procedures – II ( Replay )

5: Database Replay Workflow in Enterprise Manager-I ( Capture )

6: Database Replay Workflow in Enterprise Manager-II ( Replay )


#asm, #oracle-restart