Database Replay Workflow in Enterprise Manager-II

Database Replay Workflow in Oracle 11g Enterprise Manager:

Part-II : Replay using Enterprise Manager

 As with the PL/SQL API replay example, we must create a directory and directory object on the test server to hold the capture files from the production server. If you are using an existing directory, as we are, you must make sure it is empty before transferring the capture files to it.

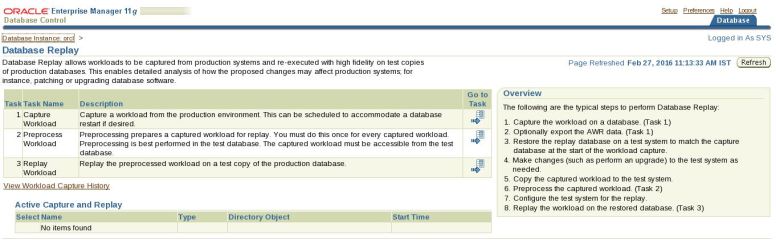
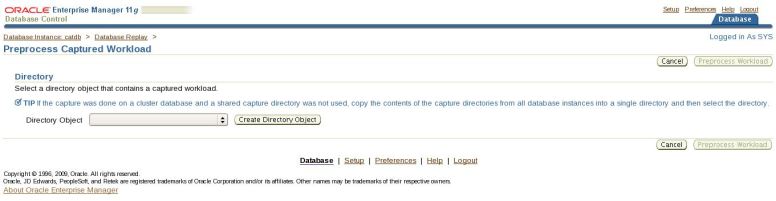
Once the capture files are in place, log on to Enterprise Manager and navigate to the Database Replay screen. Click on the “Preprocess Captured Workload” task icon.

[oracle@localhost ~]$ . oraenv

ORACLE_SID = [ORCL] ? catdb

The Oracle base for ORACLE_HOME=/u01/app/oracle/product/11.2.0/db_1 is /u01/app/oracle

[oracle@localhost ~]$ sqlplus / as sysdba

SQL*Plus: Release 11.2.0.1.0 Production on Sat Feb 27 11:23:34 2016

Copyright (c) 1982, 2009, Oracle.  All rights reserved.

Connected to an idle instance.

SQL> startup

ORACLE instance started.

Total System Global Area  630501376 bytes

Fixed Size                  2215984 bytes

Variable Size             385880016 bytes

Database Buffers          234881024 bytes

Redo Buffers                7524352 bytes

Database mounted.

Database opened.

SQL>Exit

[oracle@localhost ~]$ lsnrctl start

LSNRCTL for Linux: Version 11.2.0.1.0 – Production on 28-FEB-2016 14:42:43

Copyright (c) 1991, 2009, Oracle.  All rights reserved.

Starting /u01/app/oracle/product/11.2.0/db_1/bin/tnslsnr: please wait…

TNSLSNR for Linux: Version 11.2.0.1.0 – Production

System parameter file is /u01/app/oracle/product/11.2.0/db_1/network/admin/listener.ora

Log messages written to /u01/app/oracle/diag/tnslsnr/localhost/listener/alert/log.xml

Listening on: (DESCRIPTION=(ADDRESS=(PROTOCOL=tcp)(HOST=localhost.localdomain)(PORT=1521)))

Connecting to (DESCRIPTION=(ADDRESS=(PROTOCOL=TCP)(HOST=localhost.localdomain)(PORT=1521)))

STATUS of the LISTENER

————————

Alias                     LISTENER

Version                   TNSLSNR for Linux: Version 11.2.0.1.0 – Production

Start Date                28-FEB-2016 14:42:43

Uptime                    0 days 0 hr. 0 min. 0 sec

Trace Level               off

Security                  ON: Local OS Authentication

SNMP                      OFF

Listener Parameter File   /u01/app/oracle/product/11.2.0/db_1/network/admin/listener.ora

Listener Log File         /u01/app/oracle/diag/tnslsnr/localhost/listener/alert/log.xml

Listening Endpoints Summary…

(DESCRIPTION=(ADDRESS=(PROTOCOL=tcp)(HOST=localhost.localdomain)(PORT=1521)))

Services Summary…

Service “catdb” has 1 instance(s).

Instance “catdb”, status READY, has 1 handler(s) for this service…


[oracle@localhost ~]$ . oraenv

ORACLE_SID = [ORCL] ? catdb

The Oracle base for ORACLE_HOME=/u01/app/oracle/product/11.2.0/db_1 is /u01/app/oracle

[oracle@localhost ~]$ emctl start dbconsole

Oracle Enterprise Manager 11g Database Control Release 11.2.0.1.0

Copyright (c) 1996, 2009 Oracle Corporation.  All rights reserved.

https://localhost.localdomain:5501/em/console/aboutApplication

Starting Oracle Enterprise Manager 11g Database Control ……… started.

——————————————————————

Logs are generated in directory /u01/app/oracle/product/11.2.0/db_1/localhost.localdomain_catdb/sysman/log.


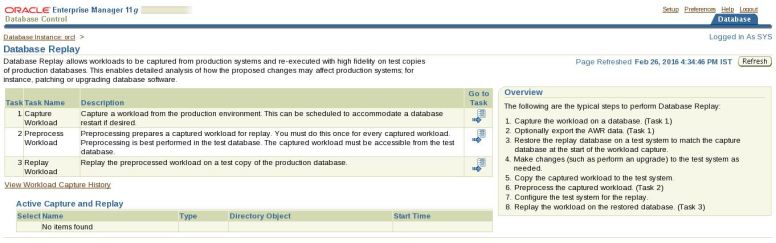
Now Navigate to “Software and Support” Tab and click on “Database Replay” Link.

1


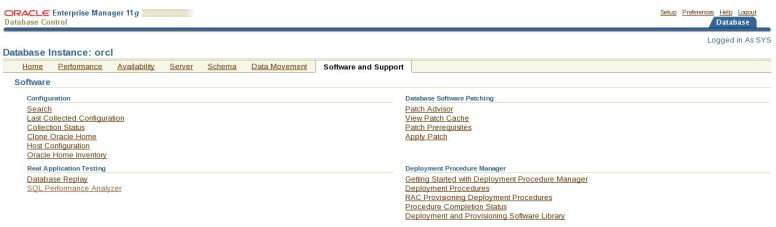
Now click on “Preprocess Workload ” Go to Task Button.

9u.JPG


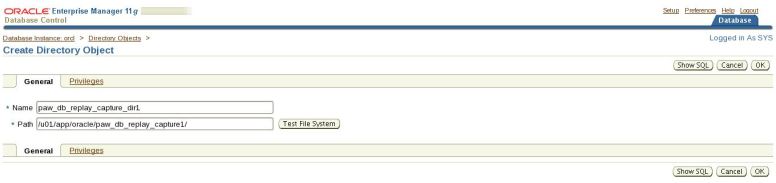
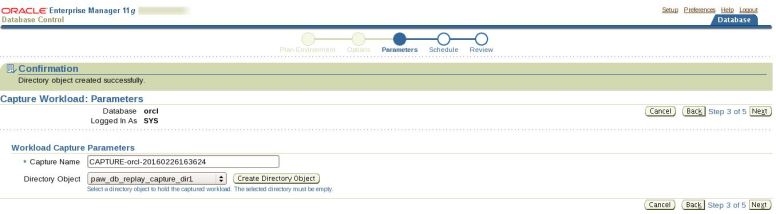
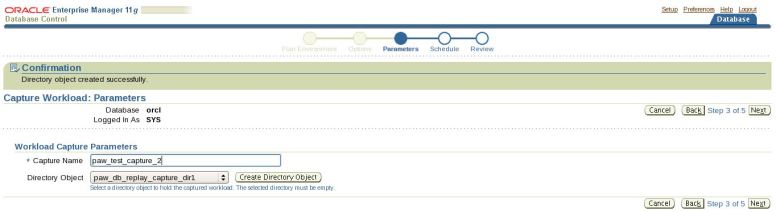
Now click on “Create Directory Object” , To Create appropriate Directory object where you want to store work capture files.

9v.JPG

9w.JPG

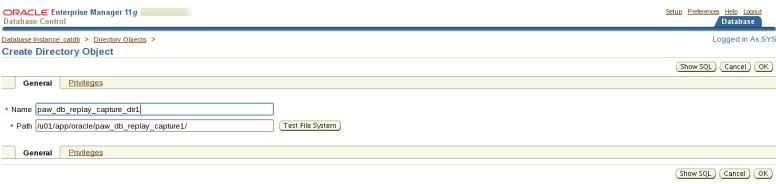
Click on “Show SQL” button will show you the SQL will run in background.

9x.JPG

On clicking “Test File System” Button will tell you whether the physical path specified is existing or not. First you need to provide Host Credentials and click on “Login” button.

9w

9y.JPG

9z

Now click on “OK” button.

9w

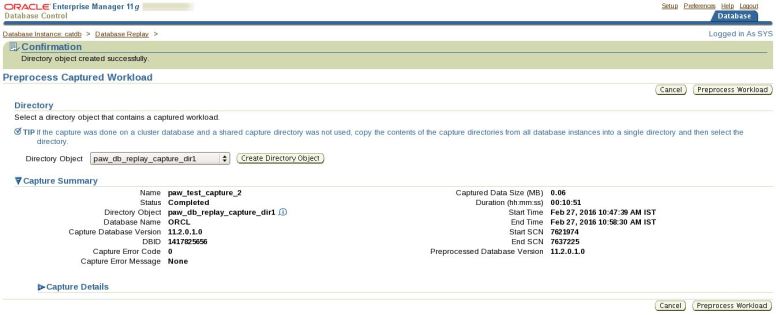
Select the directory object that points to the capture files. The screen will immediately update with information about the capture files. Click the “Preprocess Workload” button.

91a.JPG

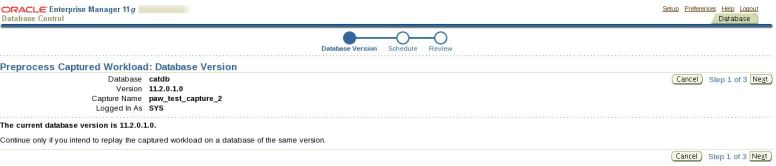
Click the “Next” button on the “Database Version” screen.

91b.JPG

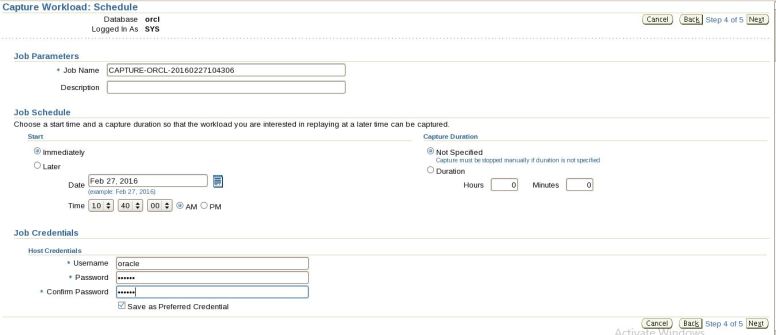
Enter the host credentials in the “Schedule” screen, then click the “Next” button.

91c.JPG


Assuming everything looks OK, click the “Submit” button.

91d


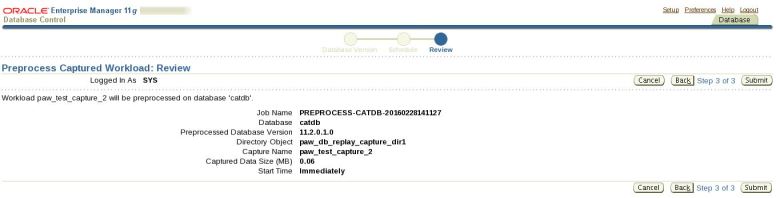
Eventually, you return to the “Database Replay” screen with a confirmation that the preprocess job has been scheduled. This job executes almost immediately, so you will probably not have to check the running jobs screen to see if it is still running.

91e


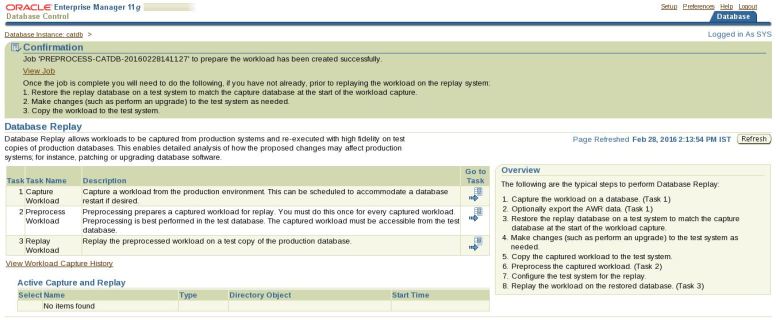
On the “Database Replay” screen, click the “Replay Workload” task icon.

91e


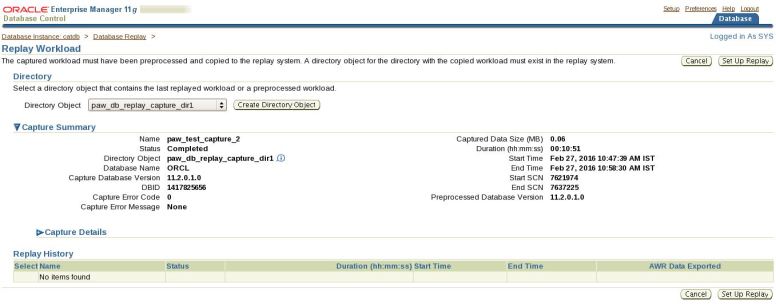
Select the appropriate directory object.

91f


91g.JPG

The screen will update immediately to reflect the contents of the selected directory. Click the “Set up Replay” button.

91h.JPG


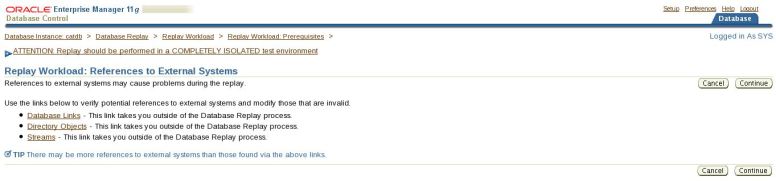
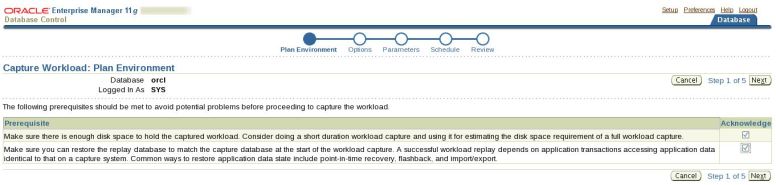
Read the prerequisites, then click the “Continue” button.

91i.JPG


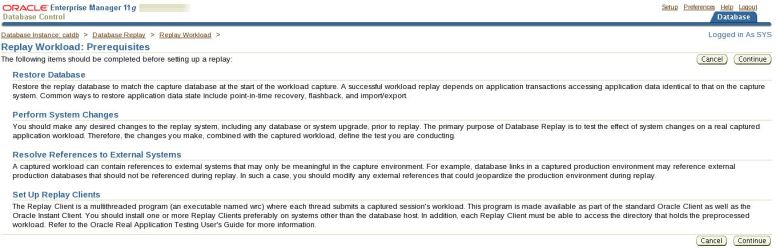
Click the “Continue” button on the “References to External Systems” screen.

91j.JPG


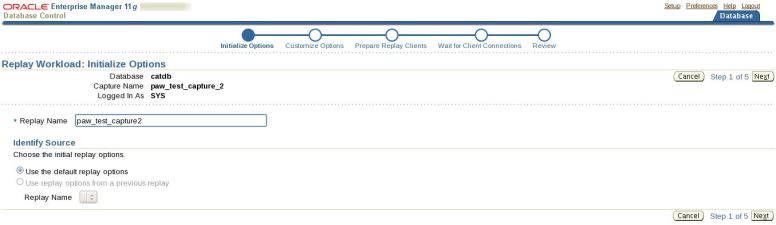
Enter a replay name, then click the “Next” button. In this example I made the replay name match the capture name, but it is not necessary.

91k.JPG


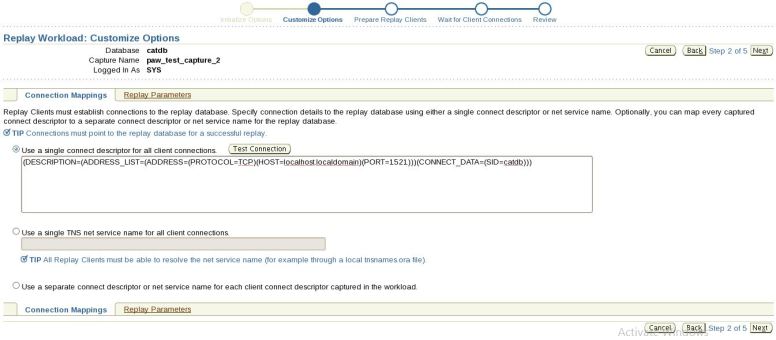
Accept the default customized options by clicking the “Next” button.

91l.JPG


Click the “Next” button on the “Prepare Replay Clients” screen.

91m.JPG


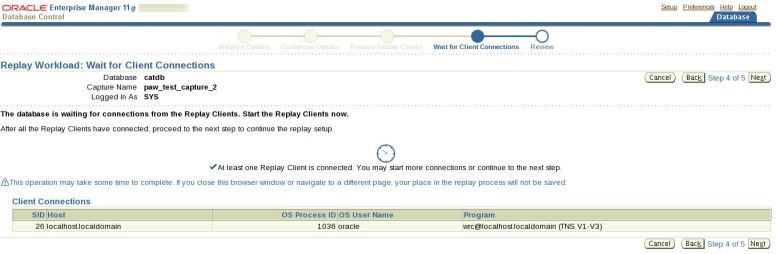
The “Wait For Client Connections” screen continually refreshes looking for Replay Client processes. At this point you must start the replay clients manually on the test server.


$ wrc system/system@catdb mode=replay replaydir=/u01/app/oracle/paw_db_replay_capture1


Workload Replay Client: Release 11.1.0.6.0 – Production on Tue Oct 30 09:34:14 2007


Copyright (c) 1982, 2007, Oracle.  All rights reserved.


Wait for the replay to start (09:34:14)


Once the replay client has started it will be shown in the “Wait For Client Connections” screen and you can click the “Next” button.

91n.JPG


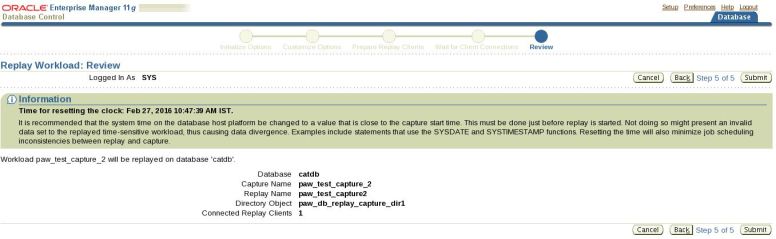
Click the “Submit” button on the “Review” screen. Notice the recommendation to alter the system time to match the capture start time. For a real replay this would make sense, as it may affect any time-based processing, but for this example it can be ignored.

91o.JPG

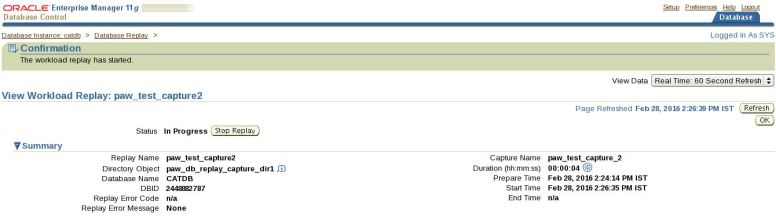
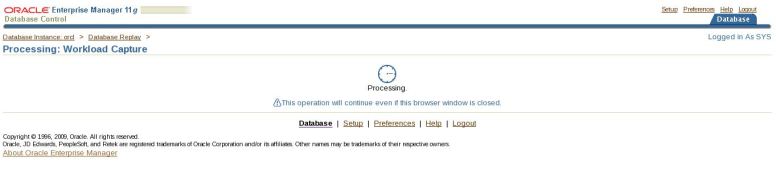
Wait while the replay process is initiated.

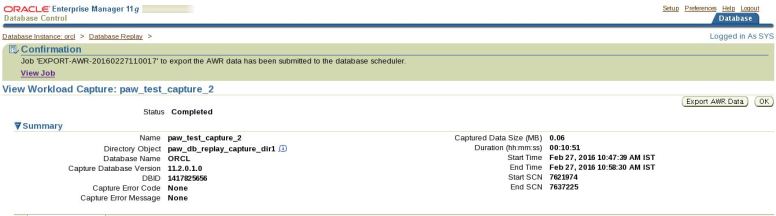
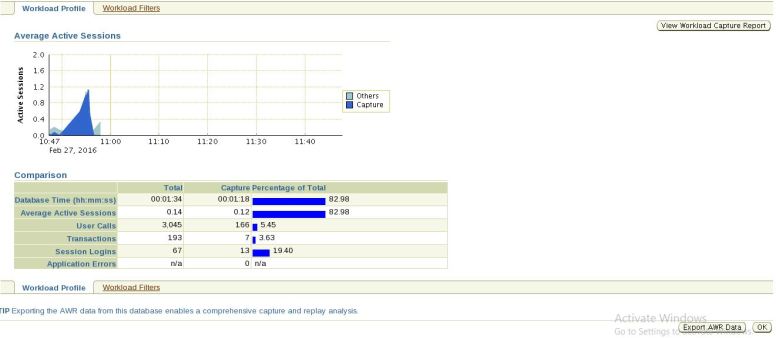
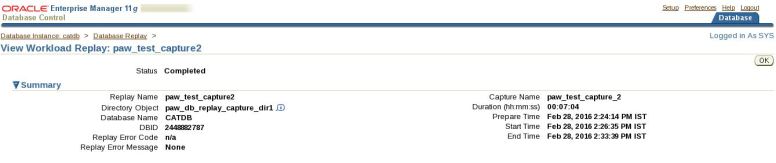
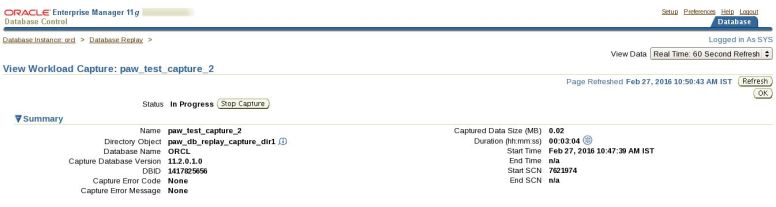
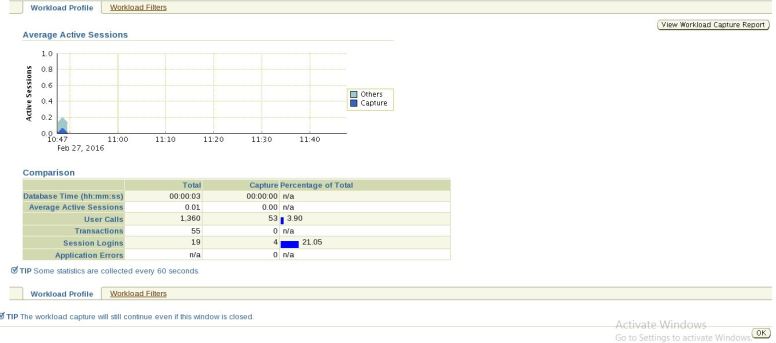
The “View Workload Replay” screen will refresh repeatedly until the replay process is complete. Once complete, the page contains a comparison of the processing done during the capture and the replay.

 91p.JPG
 91q
 91r.JPG


After completion you will get this screen.

 91s.JPG
 91t.JPG
 91u.JPG


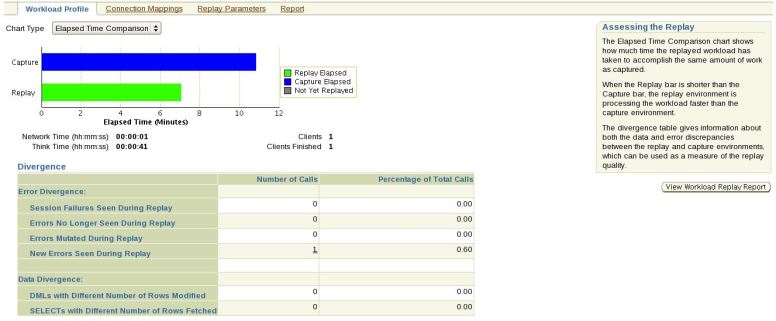
Clicking on “View Workload Replay Report” button will display the report. You can also save your reports by clicking. “Save To File” button. It will ask you to save the report. Click “OK” button.

91v.JPG

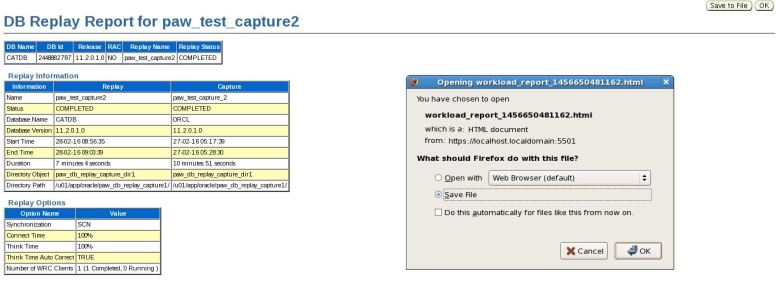
The comparison between the capture and replay processing allows you to determine if a system change has affected performance of the system.

Thank you for reading… This is Airy…Enjoy 🙂

1: Using Database Replay

2: Database Replay System Architecture

3: Database Replay PL/SQL Procedures -I ( Capture )

4: Database Replay PL/SQL Procedures – II ( Replay )

5: Database Replay Workflow in Enterprise Manager-I ( Capture )


#database-replay, #enterprise-manager

Database Replay Workflow in Enterprise Manager-I

Database Replay Workflow in Oracle 11g Enterprise Manager:

Part-I : Capture using Enterprise Manager :

As you might expect, the capture processing using Enterprise Manager is similar to that of using the PL/SQL APIs. First you must create a directory and a directory object on the production server. We are reusing those created for the PL/SQL API example, which is fine provided you delete the contents of the directory before you start a new capture.

Next, log on to Enterprise Manager on the production server (prod-11g) and navigate to “Software and Support” section, then click on the “Database Replay” link.

1

On the “Database Replay” page, click the “Capture Workload” task icon.

2

Check the acknowledge check boxes and click the “Next” button.

3.JPG

Accept the default options by clicking the “Next” button.

4

Enter a capture name and select the correct directory object path, then click the “Next” button, then Click the ” Return” button.5.JPG

6

Click the “Test File System” button.

5.JPG

Click the ” Login” button.

7.JPG

Click the ” Return ” button.

8.JPG

Click the ” OK” button.

5.JPG

Select the directory object where you want to create capture details and then Click the “Next” button.


9a.JPG

Change the Capture Name as “paw_test_capture_2” and then click the “Next” button.

9b.JPG

Enter the host credentials on the “Schedule” page, then click the “Next” button.

9c.JPG

Review the capture information, then click the “Submit” button.

9d.JPG

Wait while the capture process is initiated.

9e

The “Database Replay” screen reappears with a confirmation message informing you that the capture process has been initiated.


Click the refresh button intermittently until the “Active Capture and Replay” section of the screen lists the capture process. Once this is present you can do some processing to be captured. In this example I did a repeat of the work done in the PL/SQL API capture section.


[oracle@localhost ~]$ sqlplus / as sysdba


SQL*Plus: Release 11.2.0.1.0 Production on Sat Feb 27 10:32:32 2016


Copyright (c) 1982, 2009, Oracle.  All rights reserved.


Connected to an idle instance.


SQL> startup

ORACLE instance started.


Total System Global Area  839282688 bytes

Fixed Size                  2217992 bytes

Variable Size             616564728 bytes

Database Buffers          213909504 bytes

Redo Buffers                6590464 bytes

Database mounted.

Database opened.

SQL> CONN sys/sys@ORCL AS SYSDBA

Connected.


SQL> DROP USER paw_db_replay_user CASCADE;

User dropped.


SQL> CREATE USER paw_db_replay_user IDENTIFIED BY paw_db_replay_user

QUOTA UNLIMITED ON users;

User created.


SQL> GRANT CONNECT,RESOURCE,DBA TO paw_db_replay_user;


Grant succeeded.


SQL> CONN paw_db_replay_user/paw_db_replay_user;

Connected.

SQL> CREATE TABLE paw_db_replay_tab (

id           NUMBER,

description  VARCHAR2(50),

CONSTRAINT paw_db_replay_tab_pk PRIMARY KEY (id)

);


Table created.


SQL> BEGIN

FOR i IN 1 .. 500000 LOOP

INSERT INTO paw_db_replay_tab (id, description)

VALUES (i, ‘Description for ‘ || i);

END LOOP;

COMMIT;

END;

/

PL/SQL procedure successfully completed.


When it is time to stop the capture process, return to the “Database Replay” screen and click on the “Stop Capture” button in the “Active Capture and Replay” section.


 9f.JPG
 9g.JPG

Wait while the capture process stops, then click “Yes” to export the AWR data.

9h

9i.JPGClick on “Export AWR Data”


 9j.JPG
9k.JPG


Once the AWR export job has been submitted, you are directed to the “View Workload Capture” screen, which gives a summary of the capture process.

Clicking on “View Workload Capture Report” button will display you the report.

The capture process is now complete.


[oracle@localhost ~]$ cd /u01/app/oracle/paw_db_replay_capture1


[oracle@localhost paw_db_replay_capture1]$ ll

total 8

drwxr—– 2 oracle oinstall 4096 Feb 27 11:05 cap

drwxr—– 3 oracle oinstall 4096 Feb 27 10:47 capfiles


[oracle@localhost paw_db_replay_capture1]$ cd cap


[oracle@localhost cap]$ ll

total 6716

-rw-r—– 1 oracle oinstall 6778880 Feb 27 11:05 wcr_ca.dmp

-rw-r–r– 1 oracle oinstall   18640 Feb 27 11:05 wcr_ca.log

-rw-r—– 1 oracle oinstall   12288 Feb 27 11:05 wcr_cap_uc_graph.extb

-rw-r–r– 1 oracle oinstall   30178 Feb 27 10:59 wcr_cr.html

-rw-r–r– 1 oracle oinstall   11394 Feb 27 10:59 wcr_cr.text

-rw-r–r– 1 oracle oinstall     324 Feb 27 10:59 wcr_fcapture.wmd

-rw-r—– 1 oracle oinstall     212 Feb 27 10:47 wcr_scapture.wmd


[oracle@localhost cap]$ cd ..


[oracle@localhost paw_db_replay_capture1]$ cd capfiles/


[oracle@localhost capfiles]$ ll

total 4

drwxr—– 12 oracle oinstall 4096 Feb 27 10:47 inst1


[oracle@localhost capfiles]$ cd inst1/


[oracle@localhost inst1]$ ll

total 40

drwxr-xr-x 2 oracle oinstall 4096 Feb 27 10:58 aa

drwxr-xr-x 2 oracle oinstall 4096 Feb 27 10:47 ab

drwxr-xr-x 2 oracle oinstall 4096 Feb 27 10:47 ac

drwxr-xr-x 2 oracle oinstall 4096 Feb 27 10:47 ad

drwxr-xr-x 2 oracle oinstall 4096 Feb 27 10:47 ae

drwxr-xr-x 2 oracle oinstall 4096 Feb 27 10:47 af

drwxr-xr-x 2 oracle oinstall 4096 Feb 27 10:47 ag

drwxr-xr-x 2 oracle oinstall 4096 Feb 27 10:47 ah

drwxr-xr-x 2 oracle oinstall 4096 Feb 27 10:47 ai

drwxr-xr-x 2 oracle oinstall 4096 Feb 27 10:47 aj


[oracle@localhost inst1]$ cd aa


[oracle@localhost aa]$ ll

total 116

-rw-r–r– 1 oracle oinstall  980 Feb 27 10:47 wcr_d2cbkh0000001.rec

-rw-r—– 1 oracle oinstall 1319 Feb 27 10:47 wcr_d2cbmh0000002.rec

-rw-r–r– 1 oracle oinstall 1213 Feb 27 10:47 wcr_d2cbmh0000003.rec

-rw-r–r– 1 oracle oinstall 1200 Feb 27 10:47 wcr_d2cbnh0000004.rec

-rw-r–r– 1 oracle oinstall 1198 Feb 27 10:47 wcr_d2cbnh0000005.rec

-rw-r–r– 1 oracle oinstall 1197 Feb 27 10:47 wcr_d2cbnh0000006.rec

-rw-r–r– 1 oracle oinstall  986 Feb 27 10:47 wcr_d2cbnh0000007.rec

-rw-r–r– 1 oracle oinstall  979 Feb 27 10:47 wcr_d2cbsh0000008.rec

-rw-r–r– 1 oracle oinstall 1201 Feb 27 10:47 wcr_d2cbvh0000009.rec

-rw-r–r– 1 oracle oinstall 1200 Feb 27 10:48 wcr_d2ccch000000h.rec

-rw-r–r– 1 oracle oinstall 3990 Feb 27 10:48 wcr_d2cd8h000000j.rec

-rw-r–r– 1 oracle oinstall 1213 Feb 27 10:48 wcr_d2cddh000000n.rec

-rw-r–r– 1 oracle oinstall 1005 Feb 27 10:48 wcr_d2cdph000000p.rec

-rw-r–r– 1 oracle oinstall 2969 Feb 27 10:49 wcr_d2cfzh000000q.rec

-rw-r–r– 1 oracle oinstall 2786 Feb 27 10:49 wcr_d2cfzh000000r.rec

-rw-r–r– 1 oracle oinstall 1770 Feb 27 10:49 wcr_d2cgch000000u.rec

-rw-r–r– 1 oracle oinstall 3207 Feb 27 10:51 wcr_d2ck4h000000x.rec

-rw-r–r– 1 oracle oinstall 1311 Feb 27 10:53 wcr_d2cqrh0000019.rec

-rw-r–r– 1 oracle oinstall 3050 Feb 27 10:54 wcr_d2cqrh000001a.rec

-rw-r–r– 1 oracle oinstall    0 Feb 27 10:54 wcr_d2csah000001b.rec

-rw-r–r– 1 oracle oinstall 2969 Feb 27 10:54 wcr_d2csbh000001c.rec

-rw-r–r– 1 oracle oinstall 2786 Feb 27 10:54 wcr_d2csbh000001d.rec

-rw-r–r– 1 oracle oinstall 1200 Feb 27 10:54 wcr_d2csgh000001f.rec

-rw-r–r– 1 oracle oinstall 1201 Feb 27 10:54 wcr_d2csgh000001g.rec

-rw-r–r– 1 oracle oinstall 1200 Feb 27 10:54 wcr_d2csgh000001h.rec

-rw-r–r– 1 oracle oinstall 1764 Feb 27 10:54 wcr_d2cssh000001m.rec

-rw-r–r– 1 oracle oinstall 2604 Feb 27 10:55 wcr_d2cufh000001q.rec

-rw-r–r– 1 oracle oinstall 3120 Feb 27 10:55 wcr_d2cufh000001r.rec

-rw-r–r– 1 oracle oinstall  981 Feb 27 10:58 wcr_d2cz4h0000020.rec

-rw-r–r– 1 oracle oinstall 1161 Feb 27 10:58 wcr_d2czxh0000021.rec


[oracle@localhost aa]$ cd ..


[oracle@localhost inst1]$ cd ab


[oracle@localhost ab]$ ll

total 0


[oracle@localhost ab]$ cd ..


[oracle@localhost inst1]$ cd ac


[oracle@localhost ac]$ ll

total 0


[oracle@localhost ac]$


[oracle@localhost ~]$ . oraenv

ORACLE_SID = [ORCL] ? catdb

The Oracle base for ORACLE_HOME=/u01/app/oracle/product/11.2.0/db_1 is /u01/app/oracle


[oracle@localhost ~]$ sqlplus / as sysdba


SQL*Plus: Release 11.2.0.1.0 Production on Sat Feb 27 11:23:34 2016


Copyright (c) 1982, 2009, Oracle.  All rights reserved.


Connected to an idle instance.


SQL> startup

ORACLE instance started.


Total System Global Area  630501376 bytes

Fixed Size                  2215984 bytes

Variable Size             385880016 bytes

Database Buffers          234881024 bytes

Redo Buffers                7524352 bytes

Database mounted.

Database opened.

SQL> DROP USER paw_db_replay_user CASCADE;

User dropped.

Thank you for reading … This is Airy … Enjoy 🙂

Also Read Related Links:

1: Using Database Replay

2: Database Replay System Architecture

3: Database Replay PL/SQL Procedures -I ( Capture )

4: Database Replay PL/SQL Procedures – II ( Replay )

5: Database Replay Workflow in Enterprise Manager-II ( Replay )

#database-replay, #enterprise-manager

Database Replay PL/SQL Procedures – II

Replay using the DBMS_WORKLOAD_REPLAY Package

 The DBMS_WORKLOAD_REPLAY package provides a set of procedures and functions to control the replay process. In order to replay the logs captured on the “ORCL” system, we need to transfers the capture files to our test system. Before we can do this, we need to create a directory on the “catdb” system to put them in. For simplicity we will keep the name the same.

mkdir /u01/app/oracle/paw_db_replay_capture

Transfer the files from the production server to the test server. Next, we create a directory object pointing to the new directory.

It is a good idea to adjust the test system time to match the time when the capture process was started. This way any time-based processing will react in the same way. For this test I have ignored this step.

We can now prepare to replay the existing capture logs using the PROCESS_CAPTURE, INITIALIZE_REPLAY and  PREPARE_REPLAY procedures. I’ve named the replay with the same name as the capture process (paw_test_capture_1), but this is not necessary.

 [oracle@TestServer cap]$ . oraenv

ORACLE_SID = [ORCL] ? catdb

The Oracle base for ORACLE_HOME=/u01/app/oracle/product/11.2.0/db_1 is /u01/app/oracle

 [oracle@TestServer cap]$ sqlplus s/ as sysdba

SQL*Plus: Release 11.2.0.1.0 Production on Fri Feb 26 15:14:03 2016

Copyright (c) 1982, 2009, Oracle.  All rights reserved.

Connected to an idle instance.

 SQL> startup

ORACLE instance started.

Total System Global Area  630501376 bytes

Fixed Size                  2215984 bytes

Variable Size             381685712 bytes

Database Buffers          239075328 bytes

Redo Buffers                7524352 bytes

Database mounted.

Database opened.

 SQL> CREATE OR REPLACE DIRECTORY paw_db_replay_capture_dir AS ‘/u01/app/oracle/paw_db_replay_capture/’;

Directory created.

SQL>

BEGIN

DBMS_WORKLOAD_REPLAY.process_capture(‘PAW_DB_REPLAY_CAPTURE_DIR’);


DBMS_WORKLOAD_REPLAY.initialize_replay (replay_name => ‘paw_test_capture_1_A’,

replay_dir  => ‘PAW_DB_REPLAY_CAPTURE_DIR’);

DBMS_WORKLOAD_REPLAY.prepare_replay (synchronization => TRUE);

END;

/

PL/SQL procedure successfully completed.

Before we can start the replay, we need to calibrate and start a replay client using the “wrc” utility. The calibration step tells us the number of replay clients and hosts necessary to faithfully replay the workload.

[oracle@TestServer cap]$ wrc mode=calibrate replaydir=/u01/app/oracle/paw_db_replay_capture

Workload Replay Client: Release 11.2.0.1.0 – Production on Fri Feb 26 15:36:55 2016

Copyright (c) 1982, 2009, Oracle and/or its affiliates.  All rights reserved.

Report for Workload in: /u01/app/oracle/paw_db_replay_capture

———————–

Recommendation:

Consider using at least 1 clients divided among 1 CPU(s)

You will need at least 3 MB of memory per client process.

If your machine(s) cannot match that number, consider using more clients.

 Workload Characteristics:

  • max concurrency: 1 sessions
  • total number of sessions: 3

 Assumptions:

  • 1 client process per 50 concurrent sessions
  • 4 client process per CPU
  • 256 KB of memory cache per concurrent session
  • think time scale = 100
  • connect time scale = 100
  • synchronization = TRUE

The calibration step suggest a single client on a single CPU is enough, so we only need to start a single replay client, which is shown below.

 [oracle@TestServer cap]$ wrc system/system@catdb mode=replay replaydir=/u01/app/oracle/paw_db_replay_capture

Workload Replay Client: Release 11.2.0.1.0 – Production on Fri Feb 26 15:46:52 2016

Copyright (c) 1982, 2009, Oracle and/or its affiliates.  All rights reserved.

Wait for the replay to start (15:46:52)

The replay client pauses waiting for replay to start. We initiate replay with the following command.

SQL>

BEGIN

DBMS_WORKLOAD_REPLAY.start_replay;

END;

/

PL/SQL procedure successfully completed.

If you need to stop the replay before it is complete, call the CANCEL_REPLAY procedure.

The output from the replay client includes the start and finish time of the replay operation.

 [oracle@TestServer cap]$ wrc system/system@catdb mode=replay replaydir=/u01/app/oracle/paw_db_replay_capture

Workload Replay Client: Release 11.2.0.1.0 – Production on Fri Feb 26 15:46:52 2016


Copyright (c) 1982, 2009, Oracle and/or its affiliates.  All rights reserved.


Wait for the replay to start (15:46:52)

Replay started (15:47:42)

Replay finished (15:51:13)


Once complete, we can see the PAW_DB_REPLAY_TAB table has been created and populated in the PAW_DB_REPLAY_USER schema.


SQL> CONN sys/sys@catdb AS SYSDBA

Connected.


SQL> SELECT table_name FROM dba_tables WHERE owner = ‘PAW_DB_REPLAY_USER’;


TABLE_NAME

——————————

PAW_DB_REPLAY_TAB


SQL> SELECT COUNT(*) FROM paw_db_replay_user.paw_db_replay_tab;

COUNT(*)

———-

500000


Information about the replay processing is available from the DBA_WORKLOAD_REPLAYS view.


SQL> COLUMN name FORMAT A30


SQL> SELECT id, name FROM dba_workload_replays;


ID        NAME

————–   ————————

2        paw_test_capture_1_A


1 row selected.


In addition, a report can be generated in text or HTML format using the REPORT function.


SQL>

DECLARE

l_report  CLOB;

BEGIN

l_report := DBMS_WORKLOAD_REPLAY.report(replay_id => 2,

format     => DBMS_WORKLOAD_REPLAY.TYPE_HTML);

END;

/

Thank you for Reading…This is Airy… Enjoy  🙂

Also Read Related Links:

1: Using Database Replay

2: Database Replay System Architecture

3: Database Replay PL/SQL Procedures -I ( Capture )

4: Database Replay Workflow in Enterprise Manager-I ( Capture )

5: Database Replay Workflow in Enterprise Manager-II ( Replay )

#database-replay, #dbms_workload_replay

Database Replay PL/SQL Procedures -I

Capture using the DBMS_WORKLOAD_CAPTURE Package

The DBMS_WORKLOAD_CAPTURE package provides a set of procedures and functions to control the capture process. Before we can initiate the capture process we need an empty directory on the “ORCL” database server to hold the capture logs.

[oracle@localhost ~]$ mkdir /u01/app/oracle/paw_db_replay_capture

Next, we create a directory object pointing to the new directory.

SQL> CONN sys/sys@ORCL AS SYSDBA

Connected.

SQL> CREATE OR REPLACE DIRECTORY paw_db_replay_capture_dir AS ‘/u01/app/oracle/paw_db_replay_capture/’;

Directory created.


  • Make sure existing processes are complete.

 SQL> shut immediate

Database closed.

Database dismounted.

ORACLE instance shut down.


SQL> startup

ORACLE instance started.


Total System Global Area  839282688 bytes

Fixed Size                  2217992 bytes

Variable Size             616564728 bytes

Database Buffers          213909504 bytes

Redo Buffers                6590464 bytes

Database mounted.

Database opened.


Notice the inclusion of a shutdown and startup of the database. This is not necessary, but Oracle suggest it as a good way to make sure any outstanding processes are complete before starting the capture process.


The combination of the ADD_FILTER procedure and the DEFAULT_ACTION parameter of the START_CAPTURE procedure allow the workload to be refined by including or excluding specific work based on the following attributes:


  • INSTANCE_NUMBER
  • USER
  • MODULE
  • ACTION
  • PROGRAM
  • SERVICE


For simplicity let’s assume we want to capture everything, so we can ignore this and jump straight to the START_CAPTURE procedure. This procedure allows us to name a capture run, specify the directory the capture files should be placed in, and specify the length of time the capture process should run for. If the duration is set to NULL, the capture runs until it is manually turned off using the FINISH_CAPTURE procedure.


SQL>

BEGIN

DBMS_WORKLOAD_CAPTURE.start_capture (name     => ‘paw_test_capture_1’,

dir      => ‘PAW_DB_REPLAY_CAPTURE_DIR’,

duration => NULL);

END;

/


PL/SQL procedure successfully completed.


Now, we need to do some work to capture. First, we create a test user.


SQL> CREATE USER paw_db_replay_user IDENTIFIED BY paw_db_replay_user QUOTA UNLIMITED ON users;


User created.

 SQL> GRANT CONNECT, RESOURCE, DBA TO paw_db_replay_user;


Grant succeeded.

 Next, we create a table in “ paw_db_replay_user “ and insert some data in this table.


SQL> CONN paw_db_replay_user/paw_db_replay_user@ORCL

Connected.

 SQL>

CREATE TABLE paw_db_replay_tab

(

id           NUMBER,

description  VARCHAR2(50),

CONSTRAINT paw_db_replay_tab_pk PRIMARY KEY (id)

);

Table created.


SQL>

BEGIN

FOR i IN 1 .. 500000 LOOP

INSERT INTO paw_db_replay_tab (id, description)

VALUES (i, ‘Description for ‘ || i);

END LOOP;

COMMIT;

END;

/

PL/SQL procedure successfully completed.


Once the work is complete we can stop the capture using the FINISH_CAPTURE procedure.

SQL> CONN sys/sys@ORCL AS SYSDBA

Connected.

SQL>

BEGIN

DBMS_WORKLOAD_CAPTURE.finish_capture;

END;

/

PL/SQL procedure successfully completed.


If we check out the capture directory, we can see that some files have been generated there.


[oracle@localhost oracle]$ cd /u01/app/oracle/paw_db_replay_capture

 [oracle@localhost paw_db_replay_capture]$ ll

total 8

drwxr-xr-x 2 oracle oinstall 4096 Feb 26 14:34 cap

drwxr-xr-x 3 oracle oinstall 4096 Feb 26 14:31 capfiles


[oracle@localhost capfiles]$ cd ..


[oracle@localhost paw_db_replay_capture]$ cd cap

 [oracle@localhost cap]$ ll

total 52

-rw-r–r– 1 oracle oinstall 29160 Feb 26 14:34 wcr_cr.html

-rw-r–r– 1 oracle oinstall 10900 Feb 26 14:34 wcr_cr.text

-rw-r–r– 1 oracle oinstall   211 Feb 26 14:34 wcr_fcapture.wmd

-rw-r–r– 1 oracle oinstall   103 Feb 26 14:31 wcr_scapture.wmd


[oracle@localhost cap]$ cd ..


[oracle@localhost paw_db_replay_capture]$ cd capfiles/


[oracle@localhost capfiles]$ ll

total 4

drwxr-xr-x 12 oracle oinstall 4096 Feb 26 14:31 inst1


[oracle@localhost capfiles]$ cd inst1/


[oracle@localhost inst1]$ ll

total 40

drwxr-xr-x 2 oracle oinstall 4096 Feb 26 14:34 aa

drwxr-xr-x 2 oracle oinstall 4096 Feb 26 14:31 ab

drwxr-xr-x 2 oracle oinstall 4096 Feb 26 14:31 ac

drwxr-xr-x 2 oracle oinstall 4096 Feb 26 14:31 ad

drwxr-xr-x 2 oracle oinstall 4096 Feb 26 14:31 ae

drwxr-xr-x 2 oracle oinstall 4096 Feb 26 14:31 af

drwxr-xr-x 2 oracle oinstall 4096 Feb 26 14:31 ag

drwxr-xr-x 2 oracle oinstall 4096 Feb 26 14:31 ah

drwxr-xr-x 2 oracle oinstall 4096 Feb 26 14:31 ai

drwxr-xr-x 2 oracle oinstall 4096 Feb 26 14:31 aj


[oracle@localhost inst1]$ cd aa

 [oracle@localhost aa]$ ll

total 12

-rw-r–r– 1 oracle oinstall 1988 Feb 26 14:32 wcr_d054dh0000006.rec

-rw-r–r– 1 oracle oinstall 4062 Feb 26 14:34 wcr_d0557h0000009.rec

-rw-r–r– 1 oracle oinstall 1651 Feb 26 14:34 wcr_d058ph000000h.rec


[oracle@localhost aa]$ cd ..


[oracle@localhost inst1]$ cd ab


[oracle@localhost ab]$ ll

total 0


[oracle@localhost ab]$ cd ..


[oracle@localhost inst1]$ cd ac


[oracle@localhost ac]$ ll

total 0


[oracle@localhost ac]$ cd ..


[oracle@localhost inst1]$ cd ad


[oracle@localhost ad]$ ll

total 0


[oracle@localhost ad]$ cd ..


[oracle@localhost inst1]$ cd ae


[oracle@localhost ae]$ ll

total 0


[oracle@localhost ae]$ cd ..


[oracle@localhost inst1]$ cd af


[oracle@localhost af]$ ll

total 0


[oracle@localhost af]$ cd ..


[oracle@localhost inst1]$ cd ag


[oracle@localhost ag]$ ll

total 0


[oracle@localhost ag]$ cd ..


[oracle@localhost inst1]$ cd ah


[oracle@localhost ah]$ ll

total 0


[oracle@localhost ah]$ cd ..


[oracle@localhost inst1]$ cd ai


[oracle@localhost ai]$ ll

total 0


[oracle@localhost ai]$ cd ..


[oracle@localhost inst1]$ cd aj


[oracle@localhost aj]$ ll

total 0


[oracle@localhost aj]$ cd ..


[oracle@localhost inst1]$


We can retrieve the ID of the capture run by passing the directory object name to the GET_CAPTURE_INFO function, or by querying the DBA_WORKLOAD_CAPTURES view.


[oracle@localhost inst1]$ sqlplus sys/sys@ORCL as sysdba


SQL*Plus: Release 11.2.0.1.0 Production on Fri Feb 26 15:00:52 2016


Copyright (c) 1982, 2009, Oracle.  All rights reserved.


Connected to:

Oracle Database 11g Enterprise Edition Release 11.2.0.1.0 – 64bit Production

With the Partitioning, OLAP, Data Mining and Real Application Testing options


SQL> SQL> SELECT DBMS_WORKLOAD_CAPTURE.get_capture_info(‘PAW_DB_REPLAY_CAPTURE_DIR’)FROM   dual;


DBMS_WORKLOAD_CAPTURE.GET_CAPTURE_INFO(‘PAW_DB_REPLAY_CAPTURE_DIR’)

——————————————————————-

1

1 row selected.


SQL> COLUMN name FORMAT A30


SQL> SELECT id, name FROM dba_workload_captures;


ID NAME

———- ——————————

1 paw_test_capture_1


1 row selected.


The DBA_WORKLOAD_CAPTURES view contains information about the capture process. This can be queried directly, or a report can be generated in text or HTML format using the REPORT function.


SQL>

SQL> DECLARE

l_report  CLOB;

BEGIN

l_report := DBMS_WORKLOAD_CAPTURE.report(capture_id => 1,

format     => DBMS_WORKLOAD_CAPTURE.TYPE_HTML);

END;

/


PL/SQL procedure successfully completed.


The capture ID can be used to export the AWR snapshots associated with the specific capture run.


SQL>

BEGIN

DBMS_WORKLOAD_CAPTURE.export_awr (capture_id => 1);

END;

/


PL/SQL procedure successfully completed.


A quick look at the capture directory shows a dump file, associated log file and a graph file have been produced.


[oracle@localhost inst1]$ cd /u01/app/oracle/paw_db_replay_capture


[oracle@localhost paw_db_replay_capture]$ ll

total 8

drwxr-xr-x 2 oracle oinstall 4096 Feb 26 15:07 cap

drwxr-xr-x 3 oracle oinstall 4096 Feb 26 14:31 capfiles


[oracle@localhost paw_db_replay_capture]$ cd cap


[oracle@localhost cap]$ ll

total 5612

-rw-r—– 1 oracle oinstall 5648384 Feb 26 15:07 wcr_ca.dmp

-rw-r–r– 1 oracle oinstall   18639 Feb 26 15:07 wcr_ca.log

-rw-r—– 1 oracle oinstall   12288 Feb 26 15:07 wcr_cap_uc_graph.extb

-rw-r–r– 1 oracle oinstall   29160 Feb 26 14:34 wcr_cr.html

-rw-r–r– 1 oracle oinstall   10900 Feb 26 14:34 wcr_cr.text

-rw-r–r– 1 oracle oinstall     211 Feb 26 14:34 wcr_fcapture.wmd

-rw-r–r– 1 oracle oinstall     103 Feb 26 14:31 wcr_scapture.wmd

Thank you for Reading…This is Airy… Enjoy  🙂

Also Read Related Links :

1: Using Database Replay

2: Database Replay System Architecture

3: Database Replay PL/SQL Procedures – II ( Replay )

4: Database Replay Workflow in Enterprise Manager-I ( Capture )

5: Database Replay Workflow in Enterprise Manager-II ( Replay )


#database-replay, #dbms_workload_capture

Database Replay System Architecture

How to Use Database Replay:

The new Database Replay tool works like a DVR inside the database. Using a unique approach, it faithfully captures all database activity beneath the level of SQL in a binary format and then replays it either in the same database or in a different one (which is exactly what you would want to do prior to making a database change). You can also customize

the capture process to include certain types of activity, or perhaps exclude some.

Database Replay delivers half of what Oracle calls Oracle Database 11g’s Real Application Testing option; the other half is provided by another tool, SQL Performance Analyzer. The main difference between these two tools is the scope involved: whereas Database Replay applies to the capture and replay of all (subject to some filtering) activities in a database, SQL Performance Analyzer allows you to capture specific SQL statements and replay them. (You can’t see or access specific SQLs captured in Database Replay, while in SQL Performance Analyzer you can.) The latter offers a significant advantage for SQL tuning because you can tweak the SQL statement issued by an application and assess its impact. (SQL Performance Analyzer is covered in a forthcoming installment in this series.)

Conceptually, Database Replay works in the sequence shown in the figure below.

database_replay_architecture

  • You start a capture process that records activities against the database.
  • The process writes the activities to special files called “capture files” in a directory called /capture directory/.
  • After a while you stop the capture process and move these capture files to a test system in a directory called /replay directory/.
  • You start a replay process and several replay clients to replay all these capture files.
  • The capture files are applied against the test database.

So, what does Database Replay provide that third-party tools don’t? Well, other tools merely replay several synthetic statements, which you provide. In contrast, Database Replay does not need you to provide SQL statements. Since it captures all activity underneath the SQL, you don’t risk missing out on some key operations that may be the root of any performance issue. In addition, since you can capture selectively—for specific users, programs, and so on—and you can specify a time period when the workload is captured, you can replay specific workloads that cause you problems, not the entire database.

For instance, you notice that the month-end interest calculation program is causing issues and you suspect that changing a parameter will ease the process. All you have to do is capture the workload for the duration the month-end program runs, make the change in parameter on a test system, and then replay the capture files on that test system. If the performance improves, you have your solution. If not, well, it’s only a test system. You didn’t impede the operation of the production database.

That means Database Replay functionality of Oracle 11g allows you to capture workloads on a production system and replay them exactly as they happened on a test system. This provides an accurate method to test the impact of a variety of system changes including:

  • Database upgrades.
  • Operating system upgrades or migrations.
  • Configuration changes, such as changes to initialization parameters or conversion from a single node to a RAC environment.
  • Hardware changes or migrations.

The capture and replay processes can be configured and initiated using PL/SQL APIs, or Enterprise Manager, both of which are demonstrated in this article. To keep things simple, the examples presented here are performed against two servers (ORCL-11g and catdb-11g), both may or may not run an identical database with any SID.

Thank you for reading…This is Airy…Enjoy 🙂

Also Read Related Links:

1: Using Database Replay

2: Database Replay PL/SQL Procedures -I ( Capture )

3: Database Replay PL/SQL Procedures – II ( Replay )

4: Database Replay Workflow in Enterprise Manager-I ( Capture )

5: Database Replay Workflow in Enterprise Manager-II ( Replay )


#architecture, #database-replay

Using Database Replay

Database Replay in Oracle Database 11g Release 1:

What is your biggest concern when you need to make a change in the database—be it some minor change, such as altering initialization parameters and database attributes, or major but inevitable ones such as applying patchsets?  What about for your upgrade to Oracle Database 11g itself?

For me, the biggest concern is the risk of the change “breaking” something. Even the most minor changes can have a domino effect, eventually producing a visible impact.

To minimize this risk, most shops make the change in a control environment similar to the production one, apply a workload similar to your production system, and observe the impact. It’s rather trivial, at least technologically speaking, to replicate your production system but reproducing the workload is a different story. That’s easier said than done.

Most organizations attempt to do that using some third-party load generation tool that can run automatically to simulate real user activity. Although this approach may be adequate in most cases, it’s never a truly faithful reproduction of your production database workload. These third-party tools merely execute a pre-written query several times with different parameters; you have to supply the query to the tool and give it a range of parameters that it can use randomly. This is not a representative workload of your production system but rather merely the running of a small part of your production workload executed several times—resulting in as little as 1 percent of your application code being tested. Worst of all, these tools require you to supply all the queries from the production workload yourself, which can take weeks or months for small applications or even up to a year for complex ones.

If you could, wouldn’t it be a better approach to record all database operations—DML-related and otherwise—inside the database itself, and then replay them in the  sequence they occurred?

Thank you for Reading…This is Airy… Enjoy  🙂

Also Read Related Links:

1: Database Replay System Architecture

2: Database Replay PL/SQL Procedures -I ( Capture )

3: Database Replay PL/SQL Procedures – II ( Replay )

4: Database Replay Workflow in Enterprise Manager-I ( Capture )

5: Database Replay Workflow in Enterprise Manager-II ( Replay )

#database-replay

Using New SET NEWNAME Clauses

Restoring Data Files to Nondefault Locations:–

Using SET NEWNAME for Switching Files :–

 The SET NEWNAME command can be used only inside a RUN block. It prepares a name mapping for subsequent operations. In the example given below, the SET NEWNAME command defines the location where a restore operation of that data file will be written. When the RESTORE command executes, the users01.dbf data file is restored to /disk2/users01.dbf. It is written there, but the control file is still not pointing to that location. The SWITCH command causes the control file to be updated with the new location.

A more efficient way is to use the SET NEWNAME clause to specify the default name format for all data files in a named tablespace and all data files in the database (rather than setting file names individually, which was in database versions prior to Oracle Database 11gR2 (11.2).

The order of precedence for the SET NEWNAME command is as follows:


  1. SET NEWNAME FOR DATAFILE and SET NEWNAME FOR TEMPFILE
  2. SET NEWNAME FOR TABLESPACE
  3. SET NEWNAME FOR DATABASE


RMAN> STARTUP MOUNT;

RMAN> RUN

{

SET NEWNAME FOR DATAFILE 4 TO ‘/u02/USERS01.DBF’;

SET NEWNAME FOR DATAFILE 5 TO ‘/u02/TOOLS01.DBF’;

RESTORE DATAFILE 4, 5;

SWITCH DATAFILE ALL; # UPDATE CONTROL FILE WITH NEW FILE NAMES.

RECOVER DATAFILE 4, 5;

SQL ‘ALTER DATABASE OPEN’;

}

If database is open then put data file offline then do this:–


RMAN> RUN

{

ALLOCATE CHANNEL ch1 DEVICE TYPE DISK;

ALLOCATE CHANNEL ch2 DEVICE TYPE DISK

SQL “ALTER TABLESPACE users OFFLINE IMMEDIATE”;

SET NEWNAME FOR DATAFILE ‘/u01/app/oracle/oradata/ORCL/users01.dbf ‘ TO ‘/u02/users01.dbf ‘;

RESTORE TABLESPACE users;

SWITCH DATAFILE ALL;

RECOVER TABLESPACE users;

SQL “ALTER TABLESPACE users ONLINE”;

}


RMAN> RUN

{

ALLOCATE CHANNEL ch1 DEVICE TYPE DISK;

SQL ‘ALTER DATABASE DATAFILE 4, 5 OFFLINE’;

SET NEWNAME FOR DATAFILE 4 TO ‘/u02/USERS01.DBF’;

SET NEWNAME FOR DATAFILE 5 TO ‘/u02/TOOLS01.DBF’;

RESTORE DATAFILE 4, 5;

SWITCH DATAFILE ALL;     # UPDATE CONTROL FILE WITH NEW FILE NAMES.

RECOVER DATAFILE 4, 5;

SQL ‘ALTER DATABASE DATAFILE 4, 5 ONLINE’;

}


If you don’t run the switch command, RMAN marks the restored data file to be a valid data file copy that can be used for subsequent restore operations.


Substitution Variables for SET NEWNAME :–

 %b = Specifies the file name without the directory path *NEW*

%f = Specifies the absolute file number of the data file for which the new name is generated

%I = Specifies the DBID

%N= Specifies the tablespace name

%U = Specifies a system-generated file name of the format:  data-D-%d_id-%I_TS-%N_FNO-%f


Thank you for reading…….This is Airy …..Enjoy

#rman, #set-new-name-clause